 |  | | | |  | |  |  | Crosman Phantom 500 vs. 1000 differences |  | |  |  | |
 Posted: Sat Sep 01, 2007 1:57 am Posted: Sat Sep 01, 2007 1:57 am |
 |
|
| AirGunEric |
| Site Admin |

 |
|
| Joined: 20 Jan 2007 |
| Posts: 6908 |
| Location: "Out There" |
|
|
|
I finally got the camera out and took apart the Phantom 500 (.22 cal de-tuned springer).
Many people, especially in Canada wanted to know exactly what the differences were between the Phantom 500 and the Quest/Phantom 1000.
Well- there aren't that many:
The piston:
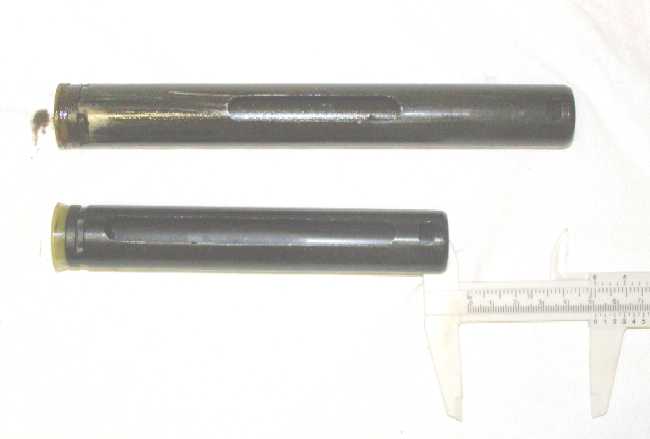
The top piston is the one from the Phantom 500, the other is a brand-new Quest 1000 piston from Crosman. The difference is pretty obvious. The 500 piston is 193mm in length, the 1000 is 143mm- so 50mm shorter on the 1000 piston, or almost exactly 2" (inches).
Someone had suggested the wall thicknesses between the two pistons differed- they do not. The walls on both are 1.5mm. Both pistons are exactly the same except for the length, trigger hole positioning and slot length.
The springs:

The top spring is the one from the 500, the bottom is a Maccari spring. I couldn't find my 1000 spring at the moment- but it sits somewhere in between these two length-wise. The 35-coil Phantom spring also had a smaller internal diameter (12mm) than the 1000 spring. This is where problems can occur if using 1000 parts in the Phantom. The 1000 front spring guide (top hat), rear spring guide and spacer will not fit inside the Phantom spring. Likewise, using a 1000-series spring that is wider will mean there will be excessive slop between the spring and the other pieces, contributing to greater spring "twang" when firing.
Here are the pieces we're talking about:

Quest 1000 tophat is on the left, Phantom 500 on the right.

Both of these pieces are from the Quest 1000. When compared to the Phantom 500 parts- they appear identical- until you notice the Quest 1000 pieces have a larger diameter and won't match the Phantom pieces.
Beyond that, although many people have mentioned they think the Phantom is a "tighter" gun that the Quest- this may only be the result of people comparing an older gun to one they just bought brand new. All the other parts of the Phantom are exactly the same as the Quest- but the trigger may have less burrs/rough edges on it than Quests did a couple years ago and the barrel bushings are almost the exact same plastic pieces they have always been- so a tighter barrel lock-up, if in fact it does exist may only be tighter machining tolerances on the Phantom than on the older Quests.
[Edited measurement detail that was reversed] |
|
Last edited by AirGunEric on Fri Oct 29, 2010 1:59 am; edited 1 time in total
_________________
`
I'd say "I care."
But I'd be lying.
Canadian Airgun Supplier: http://www.scopesandammo.com/storefront |
|
|
|
|
|
| |  |  | | | |  |  |
| | | | | | | | | | | | | | |
| Posted: Wed Sep 19, 2007 1:58 pm |
|
|
| leadman |
| Veteran Member |

|
|
| Joined: 10 Feb 2007 |
| Posts: 215 |
|
|
|
|
| i assume you can cut down the piston and still use the stock spring? |
|
|
|
|
|
|
| | | | | | | | |
| | | | | | | | | | | | | | |
| Posted: Wed Sep 19, 2007 8:38 pm |
|
|
| AirGunEric |
| Site Admin |
|
|
| Joined: 20 Jan 2007 |
| Posts: 6908 |
| Location: "Out There" |
|
|
|
Yes, if you cut it down 2", then extend the channel for the cocking arm and drill/cut a new trigger tab hole with the same spacing from the end as it was- it will work. Don't cut it too short or put the trigger hole too far towards the piston head- or problems may occur.
But be aware- modifying the spring like this will result in a 700-750fps output using 14.3gr pellets (assuming you were close to 495fps to start with) so depending on a person's location, this could put them in "licensing" territory. |
|
|
|
|
|
|
| | | | | | | | |
| | | | | | | | | | | | | | |
| Posted: Thu Sep 20, 2007 11:24 am |
|
|
| leadman |
| Veteran Member |
|
|
| Joined: 10 Feb 2007 |
| Posts: 215 |
|
|
|
|
ooh ok yeah i was just looking for ways to make this ag lighter but not increase velocity  |
|
|
|
|
|
|
| | | | | | | | |
| | | | | | | | | | | | | | |
| Posted: Sat Sep 22, 2007 3:54 am |
|
|
| Kevin26 |
| New Member |

 |
|
| Joined: 20 Sep 2007 |
| Posts: 8 |
|
|
|
|
| What I'd really like to see is Aluminum piston. Of course they'd have to be thicker than the 1.5mm (I'm guessing) found in steel pistons. But even with the increased thickness, they would be much lighter. Combine that with a Monolith Kodiak- Patriot spring and WoW!!! |
|
|
|
|
|
|
| | | | | | | | |
| | | | | | | | | | | | | | |
| Posted: Sat Sep 22, 2007 9:23 am |
|
|
| 23ib0d0n |
| Moderator |

 |
|
| Joined: 21 May 2007 |
| Posts: 757 |
|
|
|
|
Weight affects energy to pellet transfer according to Cardew experiments.
The ratio of weight, swept volume vs. stroke length and spring strength are all very finely balanced for maximum pellet velocity.
Changing to a lower weight piston and stronger spring would likely reduce energy unless the ratio is seriously out of balance to begin with {like the phantom 500} but also in the lightweight break barrels copied from the R-1 and R-9 action, accuracy suffers above 14fpe also.
Gun weight helps control 'lurch' in springers, so superlightweight rifles suffer inconsistant groups at higher energy levels. The trade off for accuracy in 16fpe .177 FT rifle is weight ~ as high as 1.1 pounds for each foot pound of energy.
Paul Cray shot very well with an 18 pound TX200 producing 16fpe until he tuned it himself. Somewhere the balance was knocked out of whack. The balance seems to sit on a very fine line between energy with accuracy and a torquing monstrosity with little more use than a paperweight.
However if you do figure a way to machine a new piston design that does increase energy, reduces torque and improves accuracy then the world doesn't mind 'borrowing' your idea without any compensation.  |
|
|
|
|
|
|
| | | | | | | | |
| | | | | | | | | | | | | | |
| Posted: Sun Sep 30, 2007 7:24 pm |
|
|
| Greenangel |
| Member |

|
|
| Joined: 30 Sep 2007 |
| Posts: 12 |
|
|
|
|
Hi there guys
i just bought a phantom 500 from walmart as a spur of the moment purchase. the gun feels great and shoots almost half way into the phone book with the pointed pellets from crosman but the price of pellets seems varied
i got 500 premium hollowpoints from walmart for $9.99 and 175 pointed pellets from canadian tire for $9.99
figured i would try both (pointed does more damage to phone book)
from what i have read online so far looks like i made an excellent choice
i really want to do this piston mod if anyone can give some really detailed close-ups with measurements of the old piston and the modded piston it would be greatly appreciated
i have a grinder a dremel and a digital caliper and really dont want to mess it up
so just to clear it up with this one piston mod it will go from stock @485
to modded piston @around 720
and a detail of what the slots in the piston do
also if (when) i do take it apart and clean out the bad gunk i keep hearing about what is the best thing to lube things up with and where to put the lubes
and about this plastic gunk stuff to stop clanking ????
thanks
looking forward to having a pellet gun with some wallop:-)

GreenAngel |
|
|
|
|
|
|
| | | | | | | | |
| | | | | | | | | | | | | | |
| Posted: Sun Sep 30, 2007 8:08 pm |
|
|
| AirGunEric |
| Site Admin |
|
|
| Joined: 20 Jan 2007 |
| Posts: 6908 |
| Location: "Out There" |
|
|
|
Look at the very top post and the first picture with the two pistons. What you are trying to do is make the longer Phantom 500 piston just like the shorter 1000 piston- which means cutting 50mm from it, putting the cocking slot (the small rectangle hole near the end/right side) in the same position and extending that long slot where the cocking arm will sit to be the same length as it is in the picture.
As for the lubing- clean out the tube you remove the piston from, the spring, everything- use something like alcohol or spray-on brake cleaner, then lube it again with oil, not grease, oil. Keep the brake cleaner away from the outside of the tube as it could remove the bluing on the steel (the black color). The "best" way is with a mixture of 20-weight non detergent oil and Molybdenum ("Moly") powder- but this may not be easy for you to find.
A workable, although not perfect compromise is to use MolySlip 'E' (for "Engines") which is approximately a 30-weight oil and molybdenum- but only about 10% content. Wipe a small amount of oil on the piston, the spring and the other metal parts you will remove and then reinstall.
Once you have it reassembled- get some sort of silicone oil (i.e. Crosman Chamber Lube) and put a few drops of it through the transfer port (the whole at the top of the tube that you can see behind where you put the pellet in before shooting. This will help dilute any oil that found its way in front of the piston seal while you were working on it. Shoot the gun 2 or 3 times, let it cool for a minute, do another 2 or 3 shots, let it cool. After a few repetitions of this- any flammable oil (i.e. the non-silicone oil) should be mainly out. If regular oil stays in the chamber/tube ahead of the piston seal without being "shot" out as described- when the piston compresses the air inside rapidly, it will heat up and ignite (or "diesel") creating more of a firearm effect- and quite possibly damaging parts of the gun (spring, piston seal)- so you want to avoid this. You'll know you're burning too much oil because you will get a "bang" and possibly break the sound barrier like a regular firearm. Smelling a bit of burnt oil isn't so bad- the gun is "dieseling"- but only a wee bit of smoke as the symptom is more the burning off of minor bits of excess lubricant (what you are probably seeing right now straight from the store) which won't kill the gun very quickly. "Big bangs" on the other hand, are very bad news.
Also one thing to remember- if you do this mod and you are in Canada- the gun will now be considered a "firearm" under the law- so you should think of having a firearms Purchase and Acquisition License in hand before starting. |
|
|
|
|
|
|
| | | | | | | | |
| | | | | | | | | | | | | | |
| Posted: Mon Oct 01, 2007 11:54 pm |
|
|
| Greenangel |
| Member |
|
|
| Joined: 30 Sep 2007 |
| Posts: 12 |
|
|
|
|
allrighty then
so i finally took it apart it is in pieces right now
so for those wondering
the washers to replace for the allignment issues are
17.9mm OD
8.5mm ID
1.6mm thick
the stock holes on the piston are
long hole 65mm long
9.8mm wide
rectangle hole
6mm wide
8.5mm high
5.5mm from back edge of piston
i did not need a spring compressor for dissasembly (used couter top in kitchen and got girlfriend to hamer out pin while i held it)
then released pressure slowly
will post more as i progress
when i am done will post full guide with pics and list of tools needed
also noticed that the grease that was in the gun was really sandy and gritty feeling (not cool in my opinion)
Greenangel
just a power hungry fiend |
|
|
|
|
|
|
| | | | | | | | |
| | | | | | | | | | | | | | |
| Posted: Tue Oct 02, 2007 12:20 am |
|
|
| AirGunEric |
| Site Admin |
|
|
| Joined: 20 Jan 2007 |
| Posts: 6908 |
| Location: "Out There" |
|
|
|
| The Phantom is not too bad for removing the spring without a compressor- the spring only hangs out of the gun maybe an inch when fully decompressed. It's a bit more of a pain to get it back in, however. You probably won't need a compressor but you'll have to be careful to get everything lined up properly or the pin won't go through smoothly, if at all. |
|
|
|
|
|
|
| | | | | | | | |
| | | | | | | | | | | | | | |
| Posted: Tue Oct 02, 2007 12:20 am |
|
|
| Greenangel |
| Member |
|
|
| Joined: 30 Sep 2007 |
| Posts: 12 |
|
|
|
|
hey there i am jsut trying to figure out what extending the long hole will do for the mod
if someone could explain why it is needed that would be good
is it so that the piston can travel further back |
|
|
|
|
|
|
| | | | | | | | |
| | | | | | | | | | | | | | |
| Posted: Tue Oct 02, 2007 12:27 am |
|
|
| AirGunEric |
| Site Admin |
|
|
| Joined: 20 Jan 2007 |
| Posts: 6908 |
| Location: "Out There" |
|
|
|
| The long hole is what the cocking arm end rides in when the piston moves. Because the Phantom 500 piston was so long with the trigger catch hole so far down- the piston did not move much at all- either up or down. Once you have moved the trigger catch hole up 2"- the piston travels 2" further down. If the slot is not extended the same amount- you will cock the gun and not be able to close the barrel, or you will end up damaging the cocking arm end or the tube. |
|
|
|
|
|
|
| | | | | | | | |
| | | | | | | | | | | | | | |
| Posted: Tue Oct 02, 2007 12:48 am |
|
|
| Greenangel |
| Member |
|
|
| Joined: 30 Sep 2007 |
| Posts: 12 |
|
|
|
|
i was reading a dissasembly report from anouther website from the b18 which is almost the same
and i had to remove the spring before the trigger would come out
do u have any tips on putting it back together without the compressor
or will it just click into place |
|
|
|
|
|
|
| | | | | | | | |
| | | | | | | | | | | | | | |
| Posted: Tue Oct 02, 2007 12:59 am |
|
|
| Greenangel |
| Member |
|
|
| Joined: 30 Sep 2007 |
| Posts: 12 |
|
|
|
|
also the brass washers are they a lot better than steel
is so where would a guy go to get brass washers
i dont recall seeing them at crappy tire
but its been a while since ive looked for washers
since it is almost 11 here i will have to wait till tomorrow to get these parts
and to mod my piston cause i would like to use the drill press and other tools at my works shop
GreenAngel
Just a power hungry fiend |
|
|
|
|
|
|
| | | | | | | | |
| | | | | | | | | | | | | | |
| Posted: Tue Oct 02, 2007 1:42 am |
|
|
| AirGunEric |
| Site Admin |
|
|
| Joined: 20 Jan 2007 |
| Posts: 6908 |
| Location: "Out There" |
|
|
|
The found the trigger easier to get installed once the spring is already in place and compressed. But, as long as you can get the tab on the arm over the little crosspiece on the tube and keep it there while you install the spring- you would be OK.
Brass washers surely must be available somewhere- perhaps at a retailer than specializes in industrial fittings. Someone out there was selling brass washers specifically sized for the B18/B19 platform. Brass is used because it wears faster than steel (i.e. the other parts of the gun), hopefully reducing any long-term wear issues that might occur with steel washers. I don't know how long it might take before a steel washer might gall things- maybe it's never something to worry about- I don't know for sure. |
|
|
|
|
|
|
| | | | | | | | |
Note: If you are seeing "Please enter your username and password to log in." Your browser cookies have been reset
or you need to register to access the topic in question. Use the 'Register' button near the top left of this page.
|


