 |  | | | |  | |  |  | My newest Project- Relum "Super Tornado" |  | |  |  | |
 Posted: Tue Jun 05, 2007 2:36 am Posted: Tue Jun 05, 2007 2:36 am |
 |
|
| AirGunEric |
| Site Admin |

 |
|
| Joined: 20 Jan 2007 |
| Posts: 6908 |
| Location: "Out There" |
|
|
|
My friend who had found two Relum's in trash bins 20 years ago gave me the "parts" (i.e. broken) gun he had after I tested and revived one of them for him (the one posted in General Topics- "Mystery Rifle" a couple months back).
Seems this is a Relum Super Tornado- based on the trigger configuration. I don't know what that means in respect to power output- but it seemed amusing.
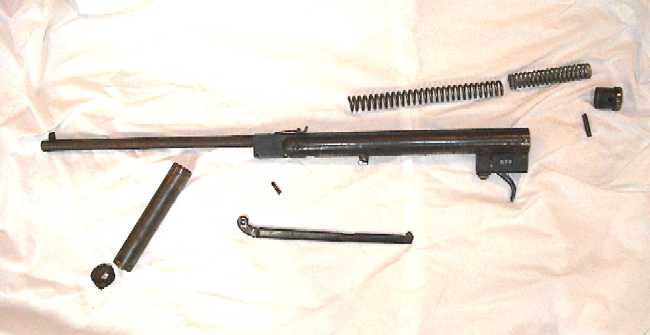
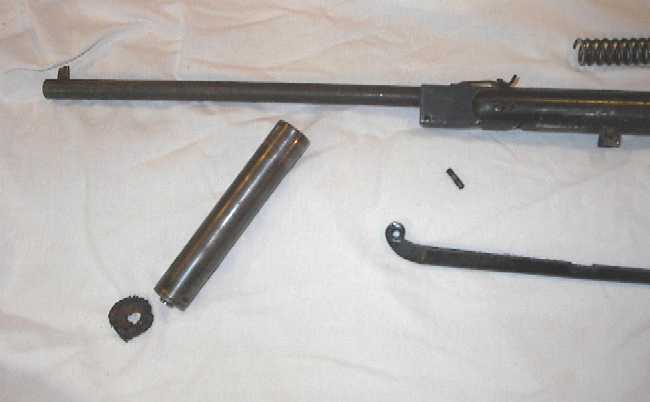
Here's a parts diagram:
The gun had seen much better days- the stock is scratched and marked, the gun would not cock, the trigger was loose and inoperative, it couldn't stay attached to the stock due to a missing bolt and both front bolt mounts being stripped.
So- I decide to take it apart and investigate.
Turns out at least one, maybe more, monkeys have been inside this poor gun!
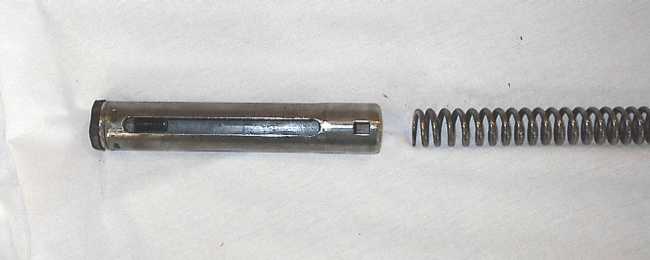
Besides the missing screws/bolts and the stripped mounts mentioned- I take out the spring(s)- turns out it was apparently one spring at some time- but it broke (I'm assuming from dry-firing) and someone put two copper pennies in between them so they wouldn't get their ragged ends stuck together. Not that this would have worked very well- the pennies were slightly smaller in diameter than the spring coils. Interestingly enough- there was 4" of spring travel from compression to full release- which seems like an awful lot when most modern guns have a travel of 2 to 3 inches maximum- so perhaps this was also not the original spring. The trigger is missing the adjustment screw and spring, as well as the main trigger spring itself. The piston is covered in goo- not like dried lube goo- but ragged, worn out piston seal mixed with engine oil goo. The cocking arm has been bent and there is a jagged edge where it fits into the tube, making it a bit 'ragged' to cock if/when it might be put in working condition again.


Sorry about the pictures- I still haven't gotten a digital camera to do decent macro/close up pictures yet!
When I get the piston out- the "leather" piston seal was apparently not leather- but some sort of synthetic, rubbery stuff that has disintegrated in a pile of flakey, sticky gunk. On the compression side of the piston are a pile of broken wires which I assume must have been some sort of home-made retention mechanism for this funky seal- there is/was no such retention mechanism in any parts diagrams I've found. Seems whoever put this little alteration in place forgot to check piston to tube head clearance and it smacked itself to smithereens- hopefully not damaging the forend of the tube significantly.
So, I clean everything up to remove the goo- wire brush the tube/chamber area, and use a bench grinder with a wire wheel to clean the piston:
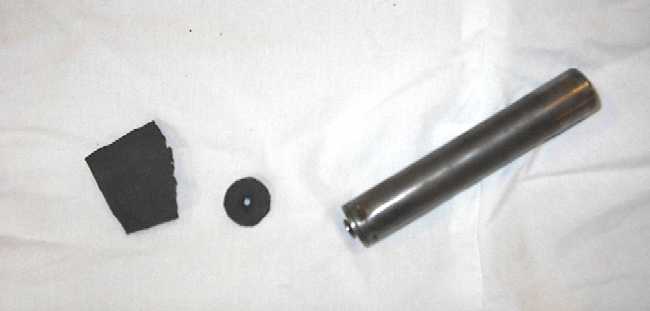
Now- the seal is useless and I have to figure out what to do (not paying £10.00 to Chambers in the UK plus shipping!). So I measure the piston- and haha! It is the same size in all dimensions as that of a Crosman Quest 1000- I could probably use a Quest piston- but that would be too easy- and I'm cheap and have lots of tools.
So- I think about this. Why not a cut-down piece of a radial automobile tire? Yeah, shaddup- I said I was cheap. The black circle in the last picture is a rough version of it which still has to be cut down a bit and that square-ish piece is another chunk of sidewall for demonstration purposes. The original retention "rivet" will have to be removed and I think I will end up welding a small washer to a 1/4" bolt, grind the head off and use a nut behind it to hold the seal in place securely- and if I use a long enough bolt- I've also created a pretty reasonable spring guide! We'll see how that works out...
Next, I tapped the stripped mounting tabs for the stock to attach to 1/4"-20 on both sides and will have to drill the stock a bit to accept the circumference of a screwhead size typically found on such a fastener.
Then, I found a suitable spring to use as the trigger spring and took apart the trigger to clean it up- fortunately there were no rough edges so just wiping off the parts was adequate. Put the spring in and verified the trigger is operational, and have decided to leave out any adjusting mechanism as it seems pointless based on its design- all it will do is shorten the trigger pull- but this gun has no safety, so that could be dangerous.
I ground down the spring ends (flattened the end coils and got rid of the jagged, broken ends) and will use 1/4" washers between them to avoid them binding together, as well as allow for some spring rotation.
Now, I still have to make that seal retention bolt, get a couple of 1/4"-20 screws for the stock, size-up the new seal properly, re-orient the cocking arm, lube it all and put it together. Then will come the testing. If all goes well- I will then re-do the metal parts (probably paint, I've never heard anything much good about the cold-blueing stuff available) and re-finish the stock (darker for sure- the lighting in the picture of the stock actually makes it look darker than it really is).
Anyways- I will post again once I get further along.
If anyone has any comment on my plans here- or advice in respect to my radial tire-based seal and what-not- post it! I think this topic might be useful to people in the future who find themselves holding on to an old Relum. |
|
|
|
|
|
|
| |  |  | | | |  |  |
| | | | | | | | | | | | | | |
| Posted: Tue Jun 05, 2007 11:31 am |
|
|
| Alstone |
| Moderator & Site Supporter |

 |
|
| Joined: 01 Mar 2007 |
| Posts: 4139 |
| Location: Linconshire, ENGLAND |
|
|
|
Hi Eric
I had a Relum airgun many years ago and was very pleased with it apart from the kick and the steel but plate.
Anyway why not use a tap washer the synthetic kind, at least it would be round to start with, as for cold blueing I get on with it alright, I find that if you clean the parts well in petrol apply the blueing compound and rub it in well with your fingers, if necessary wash again with petrol and apply again,
I get resonable results using this method.
AL |
|
|
|
|
|
|
| | | | | | | | |
| | | | | | | | | | | | | | |
| Posted: Tue Jun 05, 2007 11:44 am |
|
|
| AirGunEric |
| Site Admin |
|
|
| Joined: 20 Jan 2007 |
| Posts: 6908 |
| Location: "Out There" |
|
|
|
| Tap washer? You mean like for the kitchen sink sort of thing? That's an idea. I had gone with the tire sidewall because I thought maybe the nylon webbing in it would help keep it together in the tube- but I guess plumbing washers are pretty tough. Now I have to find my box of washers (teach me not to put it away in the right place last time I fixed a tap!). |
|
|
|
|
|
|
| | | | | | | | |
| | | | | | | | | | | | | | |
| Posted: Fri Jun 08, 2007 2:10 pm |
|
|
| AirGunEric |
| Site Admin |
|
|
| Joined: 20 Jan 2007 |
| Posts: 6908 |
| Location: "Out There" |
|
|
|
Hmm- well I put the gun back together today for testing (didn't refinish it yet either)- and it seems the trigger will not hold the piston in place, I will have to disassemble again and see if it is the problem, or if perhaps the rest in the piston skirt has been worn/polished so much through use that it can't lock onto the trigger tab.
Dang! I was really hoping it would work out without issues. Back to the workshop... |
|
|
|
|
|
|
| | | | | | | | |
| | | | | | | | | | | | | | |
| Posted: Fri Jun 08, 2007 6:57 pm |
|
|
| StevieLaner7777 |
| Moderator |
 |
|
| Joined: 07 Mar 2007 |
| Posts: 1060 |
| Location: Herefordshire, UK |
|
|
|
Speaking of things not holding in place (flying springs), How is your chin now AirGunEric??
Stevie  |
|
_________________
"Who Dares Wins" - SAS 22nd Regiment Hereford. |
|
|
|
|
|
| | | | | | | | |
| | | | | | | | | | | | | | |
| Posted: Fri Jun 08, 2007 7:03 pm |
|
|
| AirGunEric |
| Site Admin |
|
|
| Joined: 20 Jan 2007 |
| Posts: 6908 |
| Location: "Out There" |
|
|
|
Only a small bump where a scar now resides.
I'm beginning to wonder if I didn't have bad luck- I'd have no luck at all! |
|
|
|
|
|
|
| | | | | | | | |
| | | | | | | | | | | | | | |
| Posted: Sun Jun 10, 2007 1:17 am |
|
|
| AirGunEric |
| Site Admin |
|
|
| Joined: 20 Jan 2007 |
| Posts: 6908 |
| Location: "Out There" |
|
|
|
Got back to fiddling with this thing earlier today.
Turns out the trigger not locking was my fault- the washer I placed between the two spring pieces to keep them from intertwining was hitting the trigger stop/tab and not allowing the piston to travel far enough rearward to allow the tab to grab the piston. So, I removed the washer and we'll see if the springs manage to stay apart. The easy answer here is to get a new spring- so I may look into that later.
Anyways, here's some pictures of the piston with the parts:

The first picture is disassembled- my homemade seal retainer (a 1/4" washer welded to a bolt, then the head ground off the bolt to keep it all flat. Don't know why I bothered painting it. Then comes the radial tire sidewall seal. I looked at plumbing washers- but they seemed a bit soft. As I was digging through my "bolt bucket" for the bolt I used, I came across a GM HEI distributor insulator (it fits between the self-contained coil and the rotor contact) which already has a hole drilled dead-center- but it's diameter was nearly double what is needed- so I put it aside as my second choice if the tire piece doesn't work properly- it was a bit more rigid than the plumbing washer.
The red circles are plain felt- I ended up only putting one behind the seal to act as a lubricant "brush", then the piston, a washer and a 1/4" nut to hold it together. The second nut I planned to use as a lock nut up against the first- but decided against it as it might just make things that much harder to take apart later. I left the bolt as it was with a length of about an inch-and-a-half to act as a sort of spring guide and hopefully cut down any 'twanging' even if only minimally.
So I get everything assembled, sort out the trigger issue- cock it, then load a pellet, close it and fire. What happens? a teeny little knocking sound- and nothing else. Crap!
I inspect and fire it a few more times. I can't hear air escaping out the seal (not that I would necessarily anyways)- but the pellet hasn't moved in the barrel!
I get out the aluminum rod and the cleaning patches, oil one up and shove it in the muzzle- push the pellet out the rear- with a pupae case behind it! So I run the oiled patch up and down a few times and pull it out with traces of lead on it, and rust. I get another patch, run it through a few times- still some lead and now no rust.
Cock it, put another pellet in, fire it. What happens now? I get a more appropriate sounding air release, and the pellet shoots out- about 20 feet. I run the cocking arm up and down about 40 times with some oil in the chamber, try again- about 50 feet. So I put some oil in the spring tube and run the cocking arm up and down about 10 times- and try it again. It barely hits a 24" x 16" target at 60 feet (aim at top of 24" span and it will hit near the bottom- so a 2' drop in 60 feet). I load the gun full of oil, invert it so the muzzle is facing down and stick it in the corner of the workshop.
I will try to break it in some more and see if it gets any better. The other Relum I had put out a consistent 500-505fps with a 7.9gr pellet, this one so far seems to be maybe 300fps or slightly lower. The broken spring isn't helping anything, and I'm not positive about the seal I made working as well as it should. Hopefully it will mate to the chamber walls if I work it in a bit more with the excess oil everywhere.
If it doesn't get to around the 500fps mark- I may use a spring and piston from a Quest and see if I can make it work better- but that won't happen for awhile. Once I get the mechanics all sorted out- I'll move on to the metal re-bluing (or painting) and refinishing the stock. |
|
|
|
|
|
|
| | | | | | | | |
| | | | | | | | | | | | | | |
| Posted: Sun Jun 10, 2007 4:03 am |
|
|
| Alstone |
| Moderator & Site Supporter |
|
|
| Joined: 01 Mar 2007 |
| Posts: 4139 |
| Location: Linconshire, ENGLAND |
|
|
|
What happened to leather washers don't they use them these days, I remember years ago we used to boil a piece of leather in oil bolt a couple of washers each side of it and push it it into the piston bore leave it for about a day, then take it out and trim it into a cup shape, these seemed to work pretty well.
AL |
|
|
|
|
|
|
| | | | | | | | |
| | | | | | | | | | | | | | |
| Posted: Sun Jun 10, 2007 10:21 am |
|
|
| AirGunEric |
| Site Admin |
|
|
| Joined: 20 Jan 2007 |
| Posts: 6908 |
| Location: "Out There" |
|
|
|
I would have used leather- if I had any pieces laying around. What with all the vinyl out there- the only place I have any leather handy is on a couple of jackets!
If I can't get this to improve- I will obtain some leather and try that as well. |
|
|
|
|
|
|
| | | | | | | | |
| | | | | | | | | | | | | | |
| Posted: Fri Jul 06, 2007 1:06 am |
|
|
| AirGunEric |
| Site Admin |
|
|
| Joined: 20 Jan 2007 |
| Posts: 6908 |
| Location: "Out There" |
|
|
|
Update of sorts on this project. After nearly a month of letting it sit in the corner of the workshop I decided to see how it was working and if the "radial sidewall" seal had sealed up.
So, I load up a pellet and take a shot. Pfffttttt- I hear a little teeny bit of air escaping out the muzzle, no recoil, and I don't see a pellet go anywhere. I open the barrel- pellet hasn't moved. Cock it again, same thing when I try to fire. Fortunately this gun is set up so that when turned upside down you can see the piston and spring a little bit. So I fire it upside down, hear a bit of air escaping the muzzle again and watch the piston move through the tube at about 1 inch per second (i.e. barely moving)!
Seems my homemade seal sealed alright- almost completely- and so firmly the piston can barely move. So I disassemble the rifle and sand down the circumference of the seal- quite significantly to almost the diameter of the piston. I reassemble the gun and go to cock it. Holy sh!t- almost no effort required to cock it. I could/can cock it with two fingers on the barrel. Maybe 10-12lbs of cocking effort. I shoot it, and the pellet travels about 75ft/25m and drops about 10" from the POA to the POI. Couldn't actually see the pellet fly- but it was getting dark and I was shooting at my target with the forest as a backdrop. I estimate the velocity of a 7.9gr pellet at somewhere between 300 and 350fps. It also buried a pellet about half-way through a 3/8" sheet of dried-out plywood at 15ft/5m. Not even close to acceptable- but better than before.
So- the seal had expanded significantly and now that I've sanded it down it is, give or take, about the right size. The cocking effort required previously (25-30lbs) was apparently only because of the seal gumming up the travel. Turns out the spring is toast! 10-12lb of cocking effort and no real power (I can't discern any air leaking from the back of the piston- so the seal seems to be working properly.
The spring that was in it was broken in two pieces. I had flattened the ends where the break occurred and they didn't bind together much- but they still intertwined the coils a bit. Now I'm thinking of welding them together and then shimming it significantly (the heat from welding will also cause the spring to weaken even more) just as an experiment. I still have the Quest parts that I think will fit it (piston, seal and spring) but they are in a gun right now and I need to buy a new spring guide before I'm going to take that Quest apart again and tune/upgrade it completely. So- this little POS is quite the source of modding entertainment at the moment. If I can get it to around 500fps I'll probably stop and see what it took to get there from a totally FUBAR'd gun with broken and missing parts that had at least one monkey in it previously.
I think it's all this "custom" parts fiddling that's keeping me doing this- the gun itself will never be worth anything and was a department-store unit when new. |
|
|
|
|
|
|
| | | | | | | | |
| | | | | | | | | | | | | | |
| Posted: Thu Oct 30, 2008 11:20 am |
|
|
| cw |
| Banned |
 |
|
| Joined: 10 Feb 2008 |
| Posts: 1771 |
|
|
|
|
| But it's fun/challenging. |
|
|
|
|
|
|
| | | | | | | | |
| | | | | | | | | | | | | | |
| Posted: Thu Oct 30, 2008 1:17 pm |
|
|
| Slavia |
| Moderator |
 |
|
| Joined: 31 Mar 2008 |
| Posts: 4382 |
| Location: Waseca, Minnesota, USA |
|
|
|
| Quote: |
| I think it's all this "custom" parts fiddling that's keeping me doing this |
and
| Quote: |
| But it's fun/challenging. |
I can relate!
Try a second-hand store for leather - boots or an old jacket might work. |
|
_________________
 ¡Listo! ¡Apunte! ¡Fuego! ¡Listo! ¡Apunte! ¡Fuego! |
|
|
|
|
|
| | | | | | | | |
| | | | | | | | | | | | | | |
| Posted: Thu Oct 30, 2008 1:33 pm |
|
|
| AirGunEric |
| Site Admin |
|
|
| Joined: 20 Jan 2007 |
| Posts: 6908 |
| Location: "Out There" |
|
|
|
| It's been over a year since I looked at the Relum- I did pull it out and apart again about 2 weeks ago to verify the Crosman parts should (might) fit. I still have to hone the tube and then we'll plug it all together to see. Then, if all is successful comes the refinishing adventure (metal and wood- rusted and a bit stained)... |
|
|
|
|
|
|
| | | | | | | | |
| | | | | | | | | | | | | | |
| Posted: Thu Oct 30, 2008 5:40 pm |
|
|
| dummyracer36 |
| Senior Member |

 |
|
| Joined: 21 Sep 2008 |
| Posts: 723 |
| Location: St. Louis, Missouri |
|
|
|
| Quote: |
Try a second-hand store for leather - boots or an old jacket might work. |
i would try leather from an old belt or from the sole of an old dress shoe |
|
_________________
"not tonight dear, i have a race in the morning" |
|
|
|
|
|
| | | | | | | | |
| | | | | | | | | Ace hardware has leather washers | | | | | |
| Posted: Sun Nov 02, 2008 1:23 am |
|
|
| RedFeather |
| Member |

|
|
| Joined: 16 Apr 2008 |
| Posts: 56 |
|
|
|
|
| Was in my local Ace last week looking for an O ring and they had leather cup washers. May be a bit hard and have to be oiled/trimmed. Something to consider. |
|
|
|
|
|
|
| | | | | | | | |
Note: If you are seeing "Please enter your username and password to log in." Your browser cookies have been reset
or you need to register to access the topic in question. Use the 'Register' button near the top left of this page.
|


