|  | | | |  | |  |  | Crosman 1077W Stock Reshape (Pics) |  | |  |  | |
 Posted: Wed Apr 23, 2008 2:04 pm Posted: Wed Apr 23, 2008 2:04 pm |
 |
|
| StevieLaner7777 |
| Moderator |

 |
|
| Joined: 07 Mar 2007 |
| Posts: 1060 |
| Location: Herefordshire, UK |
|
|
|
Hey guys!
Obviously, I haven't modified any of my Guns for quite awhile now, but I've been thinking of doing this one for ages, so just recently I've managed to work up the confidence to get slicing and sanding.
As the Crosman 1077(W) isn't one for performance I thought I'd might as well make it look good to make up for it.
Before:
Note the Shape of the forearm and the colour of the wood.
First Cut:

I made the cut square (90*) to the forearm and also so it comes perfectly flush with the front of the barrel band.

Obviously I took the rifle out of the stock to cut it, I used the electric rotary mitre saw for the cut, (Note the bulky shape of the forearm).
Off with the Buttpad:

Notice how the butt of this 1077W is completely solid, unlike what I've heard about others with hollowed out butts which can be used as a storage compartment, (would be rattly though).
Semi Sanded:

Notice the difference in colour between the sanded section and the varnished section, (Dust masks help for this stage).
Several inches of wood swarf later:

I used the plane to achieve a much straighter surface than what sandpaper would, also saved a lot of time too by doing so.
Followed by Sanding:

Worked my way through the different grades of sandpaper, obviously finishing with the finest, (I used a sanding block to maintain the flat surface and crisp edges).

Note the much more slimmer looking forearm.
Day 2 (Varnishing):

Notice the two different levels on the top of the stock.
First coat of Satin Walnut Varnish:

Tiny bit patchy, though this is only the first layer.
Meanwhile:

I decided to overhaul the entire mechanism to check for wear and re-lube everything.
4 hours later and second coat of varnish goes on:

No more patchy look and starting to become the right colour, (I went over the stock with some very fine steel wool before applying the second coat).
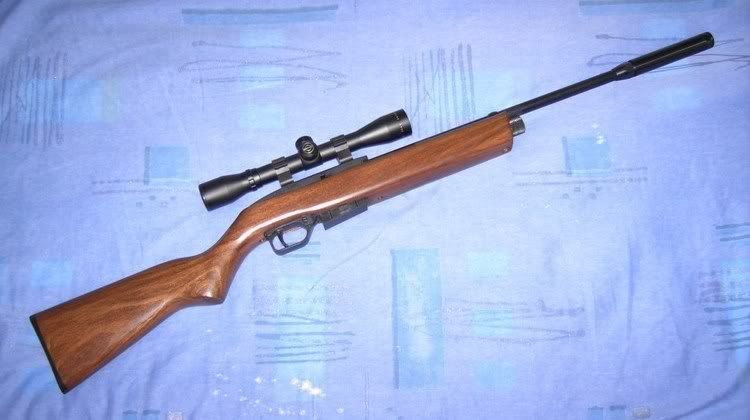
Finished result:

A much nicer slender looking stock and a bran new varnish, I put only three coats of Satin Walnut Varnish on it in the end, (It looks a lot brighter in the photos), though I'm still deciding whether I should put one or two more coats on, only thing is I don't want to cover up the natural grain of the wood as the Varnish isn't very transparent.
Things I forgot to mention:
I also machined a little cylindrical nylon barrel stabiliser for the barrel in the barrel shroud, it sits just behind the original looser fitting one at the front of the barrel shroud, it's a much tighter fitting one and took a bit of persuasion to fit it all in place, it has definitely eliminated movement of the barrel and has tightened up the grouping too!
I re-crowned the muzzle of the barrel using the lathe, but I didn't crown the inside of the muzzle as I didn't need to adjust what Crosman had already done, just the front surface to make it look nicer (even though you can't see it without being stupid enough to look down into the suppressor with a little light, makes me feel better about it though lol).
Things to come:
Bi-pod - As I still use this rifle for close range vermin control, (two CO2s in the QB78 .22 is a bit expensive if I only need to take one shot), It helps to keep the aim as steady as possible when it comes to head-shots even at close range. I'm most likely to fabricate it in college, depends on the outcome though.
Sling - Although I don't carry the rifle with me much, it does add to the overall look, but if it does get in the way I can just detach it and leave the mounts in for when I need it.
Stevie 
If only I put as much effort into my school course work years ago as I did for this  |
|
_________________
"Who Dares Wins" - SAS 22nd Regiment Hereford. |
|
|
|
|
|
| |  |  | | | |  |  |
| | | | | | | | | | | | | | |
| Posted: Wed Apr 23, 2008 6:13 pm |
|
|
| Alstone |
| Moderator & Site Supporter |
 |
|
| Joined: 01 Mar 2007 |
| Posts: 4139 |
| Location: Linconshire, ENGLAND |
|
|
|
It looks like a new gun now stevie you've done a nice job.
What did you use for staining the stock ? I like the colour.
Al |
|
_________________

 |
|
|
|
|
|
| | | | | | | | |
| | | | | | | | | | | | | | |
| Posted: Wed Apr 23, 2008 8:21 pm |
|
|
| AirGunEric |
| Site Admin |

 |
|
| Joined: 20 Jan 2007 |
| Posts: 6929 |
| Location: "Out There" |
|
|
|
Nice job. Maybe you should've gone with the new Crosman "style" and painted it pink or something too!  |
|
|
|
|
|
|
| | | | | | | | |
| | | | | | | | | | | | | | |
| Posted: Wed Apr 23, 2008 9:30 pm |
|
|
| losttourist |
| Member |

|
|
| Joined: 20 Mar 2008 |
| Posts: 18 |
|
|
|
|
| Handsome looking gun you have there! Nicely done. |
|
|
|
|
|
|
| | | | | | | | |
| | | | | | | | | | | | | | |
| Posted: Thu Apr 24, 2008 3:11 pm |
|
|
| StevieLaner7777 |
| Moderator |
|
|
| Joined: 07 Mar 2007 |
| Posts: 1060 |
| Location: Herefordshire, UK |
|
|
|
Thanks for all the replies guys, they are very much appreciated!
Al
I used B&Q "quick drying" Woodstain in Satin Walnut for the stock:

Yep that one!
Stevie |
|
_________________
"Who Dares Wins" - SAS 22nd Regiment Hereford. |
|
|
|
|
|
| | | | | | | | |
| | | | | | | | | 1077 Woody.... | | | | | |
| Posted: Sun Jun 15, 2008 1:31 pm |
|
|
| yourdaddyjoe |
| Supporting Member |

 |
|
| Joined: 26 May 2008 |
| Posts: 4027 |
| Location: Tatorville, USA |
|
|
|
Hey Steve,
I played around in photo shop for a concept design for when I do my custom wood stock for my 1077... Here is what I came up with...

Here is yours with a wood hand guard & bands to cover the screws from removing the rear sights...

Thanks for the photo to play with...
Joe |
|
|
|
|
|
|
| | | | | | | | |
| | | | | | | | | | | | | | |
| Posted: Tue Jun 17, 2008 7:25 pm |
|
|
| 2RCHA |
| Veteran Member |

 |
|
| Joined: 21 Feb 2007 |
| Posts: 195 |
| Location: The Big Smoke, Ontario |
|
|
|
| For your QB-78, If you don't want to use 2 cart's, you don't have to, just use an empty cart as your second, and it's alot more wallet friendly now, and the shot count is still very good. Cheer's, Andy. |
|
_________________
QB78-D w/Fitco 4-16x44CE
2x,XS B4-2a .177/.22 w/Fitco 3-9x40
XS B2-2a .22 w/Simmons 3-9x40
XS B9-1 w/AimPoint CompM2
TAC1 Extreme w/Tasco 3-9x40/Var,. Kit
2240/2289g w/Fitco 3-12x40K-GD
Gamo Recon w/ Fitco 2-7x32k
QB-57Deluxe .22 w/Fitco 2-7x32k |
|
|
|
|
|
| | | | | | | | |
Note: If you are seeing "Please enter your username and password to log in." Your browser cookies have been reset
or you need to register to access the topic in question. Use the 'Register' button near the top left of this page.
|