 |  | | | |  | |  |  | Re: Homemade pellets |  | |  |  | |
 Posted: Mon Oct 12, 2009 2:42 pm Posted: Mon Oct 12, 2009 2:42 pm |
 |
|
| Brutuz |
| Senior Member |

|
|
| Joined: 12 Jan 2009 |
| Posts: 504 |
|
|
|
|
| Griff1950 wrote: |
| Cast the bullets upside down, cut them off at the nose |
That's how RWS does it, noticed that making close up pics.
Al you'll be needing a new lid for your tins 
 |
|
_________________

Crosman [1300 1322 1377 1377c 1389 2289G Mark II SSP250 2300KT 2400KT ]
Sheridan [HB20]
Haenel [III 284]
SMK [XS78 Deluxish]
My vids on Youtube |
|
|
|
|
|
| |  |  | | | |  |  |
| | | | | | | | | | | | | | |
| Posted: Mon Oct 12, 2009 3:08 pm |
|
|
| Slavia |
| Moderator |

 |
|
| Joined: 31 Mar 2008 |
| Posts: 4382 |
| Location: Waseca, Minnesota, USA |
|
|
|
| Quote: |
| the ratio of the TX I was using is 1.25 |
By that do you mean feet per twist (15 inches per twist)? I'm guessing so; I once measured my Slavia at 1:18 and an Avanti (Daisy) 853 at 1:21.
Here's the Greenhill and Miller Twist Rule formulas relating twist rate to projectile dimensions:
http://en.wikipedia.org/wiki/Rifling
http://www.jbmballistics.com/bibliography/articles/miller_stability_2.pdf
Of course that is for (mostly) supersonic projectiles; a subsonic airgun pellet would also have some drag stabilization.
A few years ago when I was launching 2 litre soda bottles with compressed air and water, I learned that to drag-stabilize a soda bottle the center of mass needed to be at least 1/2 bottle diameter ahead of the lateral center of pressure. (In an axially symmetrial body like a bottle or pellet, "center of lateral pressure" is also the center of projected area.)
It looks like you have nice clean obturation in the two bands. You're approaching the design of the old Sheridan .20 pellets, except Sheridan used a more pronounced skirt band:

Very interesting project. |
|
_________________
 ¡Listo! ¡Apunte! ¡Fuego! ¡Listo! ¡Apunte! ¡Fuego! |
|
|
|
|
|
| | | | | | | | |
| | | | | | | | | | | | | | |
| Posted: Mon Oct 12, 2009 4:48 pm |
|
|
| Alstone |
| Moderator & Site Supporter |
 |
|
| Joined: 01 Mar 2007 |
| Posts: 4139 |
| Location: Linconshire, ENGLAND |
|
|
|
Thanks Griff I didn’t think about reversing the process, the only thing is deciding where to split the mould. 
Looking at it logically I think I will have to split it just before the nose starts, that way I can lift the nose part of the mould off leaving the pellet sat in a hole, with a pin up the base to make the internal hole, if this part of the mould is removable I could push the pellet out through the bottom of the mould.
Cheers Brutuz for the Tin design, It will take a bit of sweat filling it. 
Slavia The twist is 1.25 in 12"
Al |
|
_________________

 |
|
|
|
|
|
| | | | | | | | |
| | | | | | | | | | | | | | |
| Posted: Tue Oct 13, 2009 1:47 pm |
|
|
| Alstone |
| Moderator & Site Supporter |
|
|
| Joined: 01 Mar 2007 |
| Posts: 4139 |
| Location: Linconshire, ENGLAND |
|
|
|
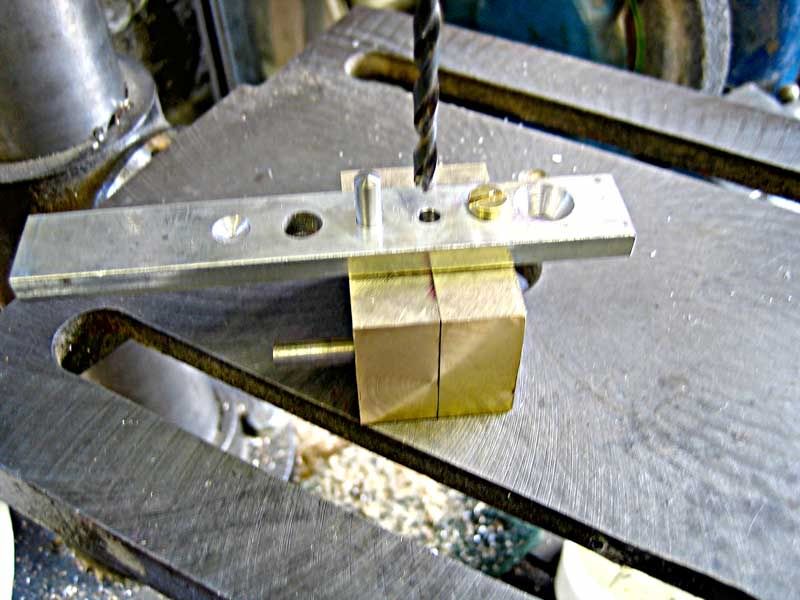
Ok then! I got the reverse mould made so that the lead could be pored from the head of the pellet, I also incorporated a sprue cutter. But all to no avail the problem is that when you pour the hot lead in from the head of the pellet, as the lead reaches the skirt which is quite thin, the lead cools down to fast and sets before reaching the base, I have tried increasing the temperature of the mould but because air is trapped below the lead it goes no further.
I have a friend who has a die cast injection company, so I went around to see him for any tips he could give me. The first was that the lead needed to be injected to get a good finish, the second was that I was wasting my time doing it that way, and go back to the original method of pouring the led from the base and drilling out the hole.
One thing he did tell me was how commercial pellets are made, evidently on his travels he visits many exhibitions of moulding machines, and at one of these there was a stand making airgun pellets. The way it was done was that reel of lead wire is fed in to an extruding machine and finished pellets are spat out of the other end, evidently cold forged.
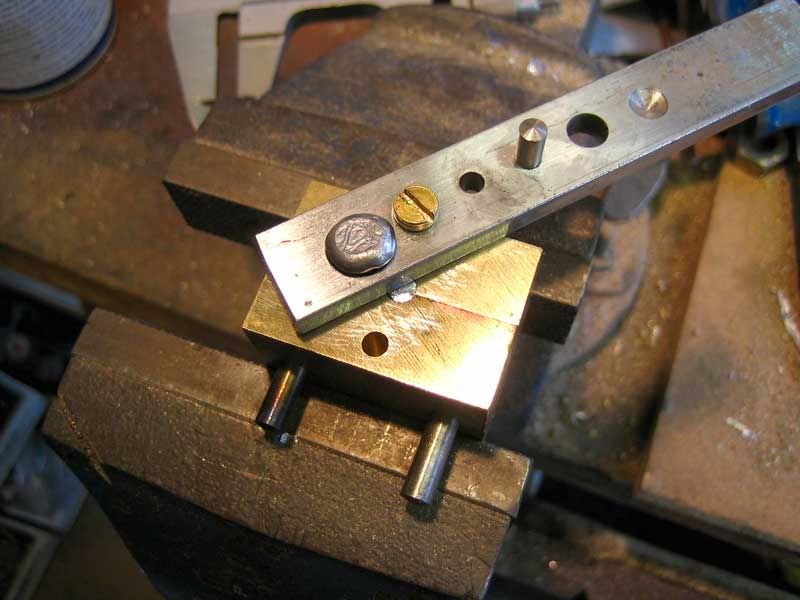
These are the parts making up the mould for feeding the lead in from the nose end
The same parts assembled. The silver bar on the top of the mould is the sprue cutter.
This is a pellet produced with an unfinished skirt.
I don’t intend to pursue this method any more, which is a shame as it seemed to have potential.
I think I'll go back to the first mould and incorporate a hole drilling jig.
Al |
|
_________________
|
|
|
|
|
|
| | | | | | | | |
| | | | | | | | | | | | | | |
| Posted: Tue Oct 13, 2009 9:34 pm |
|
|
| dogon1013 |
| Member |

|
|
| Joined: 15 Nov 2007 |
| Posts: 58 |
| Location: Sunshine State |
|
|
|
|
|
|
|
|
|
| | | | | | | | |
| | | | | | | | | | | | | | |
| Posted: Wed Oct 14, 2009 3:45 am |
|
|
| Alstone |
| Moderator & Site Supporter |
|
|
| Joined: 01 Mar 2007 |
| Posts: 4139 |
| Location: Linconshire, ENGLAND |
|
|
|
Yes I had seen it a while ago but couldn’t find it, but looking at it again it seems he has the same problems as me regarding grouping.
The problem I find is quality of the moulding and the ones on the link seem a bit rough regarding flashing on the mould joint, and this can throw a pellet off considerably, plus his hole drilling could be better, but after saying that he as just knocked them out using any bit of scrap he has around the workshop, which is impressive.
I am in the process of making another mould at the moment, that will incorporate a hole drilling jig and cutter, hopefully I will get it finished later to day.
Al |
|
_________________
|
|
|
|
|
|
| | | | | | | | |
| | | | | | | | | Pellet moulds | | | | | |
| Posted: Thu Oct 15, 2009 1:55 pm |
|
|
| Griff1950 |
| Member |
|
|
| Joined: 29 Apr 2009 |
| Posts: 72 |
| Location: Arkansas |
|
|
|
| Al, I'm afraid you misunderstood me. Split your mould blocks vertically just as you were doing in the beginning, just invert the bullet in the mold. Your moulds will have to be very hot to make a good pour, and you will have to engrave vent lines so that the base can fill completely. The vent lines are easily cut in brass, in tougher metals, you can use a triangle file. You can make any type base plug you desire, and make the skirt as thin or as thick as needed. It can also be helpful to make a sizing die, as pellets don't always come out the same size as the mould. Differences in temp in the mould blocks can sometimes have a pronounced effect on bullet diameter. |
|
|
|
|
|
|
| | | | | | | | |
| | | | | | | | | | | | | | |
| Posted: Thu Oct 15, 2009 2:08 pm |
|
|
| Alstone |
| Moderator & Site Supporter |
|
|
| Joined: 01 Mar 2007 |
| Posts: 4139 |
| Location: Linconshire, ENGLAND |
|
|
|
Cheers Griff, I did think about doing it that way but was concerned about flash from the vent holes, as I didn’t want to have to finish the pellet after moulding.
Al |
|
_________________
|
|
|
|
|
|
| | | | | | | | |
| | | | | | | | | | | | | | |
| Posted: Fri Oct 16, 2009 7:57 am |
|
|
| Alstone |
| Moderator & Site Supporter |
|
|
| Joined: 01 Mar 2007 |
| Posts: 4139 |
| Location: Linconshire, ENGLAND |
|
|
|
I decided to go back to my original mould idea as it was simple and worked ok, it just needed a bit more care and getting the centre hole equal and deeper.
This is the MK 4 pellet mould and I hope the last one. It is similar to No 2 but as the addition of a sprue cutter and hole boring jig
The sprue cutter trims off the spare lead from the back of the pellet.
It is then swung around and used as a drilling jig to drill a hole up the base of the pellet.
The pellets come out quite well and need no further finishing, the pellet from my TX collected a few rifling marks from the barrel choke. The finished weight is 10 grain.

Grouping is not bad 10mm but could be better, this target was five shots using a TX at 20m from a bench.

A very interesting project and I have enjoyed making the bits and trying out the pellets, but I think it is easier to go out and buy pellets than make them. Unless of cause you want something special?
Al |
|
_________________
|
|
|
|
|
|
| | | | | | | | |
| | | | | | | | | | | | | | |
| Posted: Fri Oct 16, 2009 10:38 am |
|
|
| Brutuz |
| Senior Member |
|
|
| Joined: 12 Jan 2009 |
| Posts: 504 |
|
|
|
|
| Very impressive Al |
|
_________________
Crosman [1300 1322 1377 1377c 1389 2289G Mark II SSP250 2300KT 2400KT ]
Sheridan [HB20]
Haenel [III 284]
SMK [XS78 Deluxish]
My vids on Youtube |
|
|
|
|
|
| | | | | | | | |
| | | | | | | | | | | | | | |
| Posted: Fri Oct 16, 2009 12:53 pm |
|
|
| fritz |
| Silver Status Member |

 |
|
| Joined: 25 Nov 2008 |
| Posts: 2442 |
| Location: New Jersey- outside of Philadelphia |
|
|
|
Very impressed with the accuracy.
Do you plan to chrono them, and figure the BC anytime soon?
EDIT: adding a space to the headspace would make for easy hollowpoints |
|
Last edited by fritz on Fri Oct 16, 2009 5:30 pm; edited 1 time in total
_________________
"I never set out to be wierd, it was always everyone else who called me it" -Frank Zappa
Speed is impressive, accuracy is deadly.
It's not that I'm not a people person, it's just that I'm not a stupid people person. |
|
|
|
|
|
| | | | | | | | |
| | | | | | | | | | | | | | |
| Posted: Fri Oct 16, 2009 1:24 pm |
|
|
| dogon1013 |
| Member |
|
|
| Joined: 15 Nov 2007 |
| Posts: 58 |
| Location: Sunshine State |
|
|
|
Looks good.
and you can easilly change the weight by not drilling as far, or changing the drill size. |
|
|
|
|
|
|
| | | | | | | | |
| | | | | | | | | I read this somewhere AlStone. | | | | | |
| Posted: Sat Oct 17, 2009 10:17 am |
|
|
| BBGun Bob |
| Veteran Member |

 |
|
| Joined: 29 Oct 2007 |
| Posts: 474 |
| Location: Michigan |
|
|
|
A small waist is required(a must) on pellets because of the slow twist rate. I read somewhere that a small waste is required behind the head of a pellet.This reduces drag along the pellets side surface and concentrate's air passing by the pellet to the skirt.This action is what creates drag on the rear of the pellet and allows head first flight at all times.Without some sort of bottle design followed by a skirt a pellet's flight will tumble .
A pellet is much like a shuttlecock(think badminton birdy) rather than a dart.Because of the slow twist rate of pellet gun barrels there is not enough spin on a straight sided projectile to keep in from tumbling in flight no matter how fast it travels(FPS).
I just thought I'd pass this along while your racking your brain.LOL
Best Regards
BBGun Bob
PS:
Even the old Sheridan Cylindrical pellets had a small waste incorporated into there design if you look real close. |
|
_________________
Air Guns Create Many Questions ! !
Together We Can Answer Them ! ! |
|
|
|
|
|
| | | | | | | | |
| | | | | | | | | | | | | | |
| Posted: Sat Oct 17, 2009 10:38 am |
|
|
| Alstone |
| Moderator & Site Supporter |
|
|
| Joined: 01 Mar 2007 |
| Posts: 4139 |
| Location: Linconshire, ENGLAND |
|
|
|
Hi Bob, hope your keeping well?
Thanks for the tip, I’ll alter the mould and give it a try, I was trying to get away from waisted pellets so that I could get them to auto feed into a breach, stacked side by side instead of end to end.
The last batch I made were pretty good regarding quality and finish, but the best grouping I could get was 10mm, so you could have something there, I’ll try a small waist first and see what happens, the thing is to protect the skirt from damage.
Al |
|
_________________
|
|
|
|
|
|
| | | | | | | | |
| | | | | | | | | | | | | | |
| Posted: Sat Oct 17, 2009 4:14 pm |
|
|
| jlwilliams |
| Veteran Member |
|
|
| Joined: 02 Oct 2009 |
| Posts: 264 |
| Location: Jacksonville, NC USA |
|
|
|
| Are they making neat holes or keyholes? If you shoot them at a box, do they make round holes in both sides of the box? Or do they make a round one in the front and an oblong 'keyole' in the back? The box trick will help you see if they are tumbling in flight. |
|
|
|
|
|
|
| | | | | | | | |
Note: If you are seeing "Please enter your username and password to log in." Your browser cookies have been reset
or you need to register to access the topic in question. Use the 'Register' button near the top left of this page.
|


